
A gitár hangzásának beállítása
https://guitargearfinder.com/guides/ultimate-guide-to-guitar-amp-settings/
Az alábbi szöveg a fenti cikk fordításán alapul:
Ha gitár erősítőt vásárolsz vagy a jelenlegi cseréjén gondolkodsz, akkor ez a cikk neked szól!.
A gyakorló cuccot egy nagy teljesítményű rendszerre akarsz váltani?
Zenészként gyakran látom, hogy a zenésztársaim nincsenek megelégedve az erősítőjük hangszínével, és ezért állandóan lecserélik a meglévő erősítőiket, effektjeiket. Ez általában így történik:
- A zenész vesz egy új erősítőt. Játszik rajta egy ideig és elkeseredik, mert nem produkálja a kívánt hangzást, ezért elmegy a hangszerboltba.
- Az eladó azt mondja, hogy a jelenlegi erősítője nem alkalmas a kívánt hatás elérésére és ajánl másikat.
- Az eladó bemutatja az erősítőt, a kolléga megveszi, mert a hangszíne megfelel neki.
- Néhány hét után a zenésztárs elégedetlen lesz, mert mégsem ezt akarta...
Ez gyakran megtörtént az ismerőseim között. mielőtt belemennénk, hogy hogyan kell beállítani bármelyik erősítőn a jó hangzást nézzük meg mi a probléma és hogyan kerüljük el.
Az embereknek különböző elképzeléseik vannak arról, hogy melyik erősítők alkalmasak a különböző stílusokhoz
Ha egy bizonyos stílust szeretne a zenész játszani, a többi zenész különböző gitárerősítőt fog javasolni hozzá (Marshall, Mesaboogie, Laney, Fender, ...), hogy megfeleljenek ennek a stílusnak. Bár a javaslat hasznos lehet, de általában a jelenlegi erősítő választását kétségbe vonja , már ha van neki.
Tehát, ha van egy erősítőd és egy másik zenész azt mondja, hogy válassz másikat, akkor kétségbe fogod venni a korábbi választásodat.
Ha nem vagy biztos abban, hogy jól választottál-e, akkor olvasd el az alábbi útmutatót az erősítő típusokról (anoglul: https://guitargearfinder.com/guides/different-types-of-guitar-amps-explained/) .
Egy bolti eladó vagy egy tapasztalt zenész tudja, hogyan kell beállítani a jó hangzást szinte bármelyik erősítőn.
Egy jó gitáros szinte bármelyik gitáron és erősítőn tud jó hangzást beállítani. Jobban fog szólni, mint ami elvárható tőle. Az eladók tudnak olyan trükköket, amivel az általuk eladni kívánt erősítő tényleg jobban fog szólni. Ha megnöveli egy erősítő hangerejét, akkor azt a vásárló úgy érzékeli, hogy az jobban szól. A Hifi cuccok eladásánál is alkalmazzák ezt a trükköt. Még a szakértőket is meg lehet vezetni ezzel.
A cuccod hibáztatása nem megoldás!
A legtöbb kezdő és középhaladó zenész frusztrált a felszerelése miatt, mert nem tudja visszaadni a dalokban hallott hangszínt.
A gitár erősítők előbeállításai (és miért hagyd figyelmen kívül)
Sok olyan webhely van, amely megmondja, hogy milyen stílushoz milyen beállításokat használj. Például::
METAL: Drive 10, Bass 10, Mid 1, Treble 7, Vol 8
ROCK: Drive 7, Bass 5, Mid 7, Treble 7, Vol 7
BLUES: Drive 3, Bass 2, Mid 5, Treble 2, Vol 6
A fő probléma, hogy minden erősítő más és más, ezért ami az egyiken működik, az a másikon nem biztos, hogy jól fog szólni.
Még ha ugyanazt az erősítőt használja, mint a tanácsadó, a pedálok és a gitár különbözősége miatt másképpen fog szólni a sajátja. A fő tanulság az, hogy a beállítások nem tanítják meg, hogyan kell beállítani az erősítőt.
Gitárerősítők alapjai
A főbb beállítási lehetőségek az alábbiak (minden erősítőn).

A képen bemutatott Fender Mustang erősítő, egy digitális modellező, ezért vannak rajta további lehetőségek is, mint általában. A legtöbb régebbi comboban (erősítő és hangfal egyben) csak zengetés van, de a maiak különböző digitális effekteket tartalmazhatnak.
- Gain - A bemenet erősítése
- Volume - Hangerő (vagy csak a csatoráné, ha van több csatorna)
- Treble & Bass - Magas és mély
- Master - Ha több csatoran van, akkor a teljes erősítő hangereje
- Preset LED kijelzővel - A beállítások eltráolva
- Modulation & Delay/Reverb - Effektek beállítása gomb
Ez az erősítő különböző erősítő típusokat modellez digitálisan. ez ma már nagyon elterjedt..

Ez a Marshall MG15DFX above további példa a combokra, amin egyszerűbb effektek vannak.
- Volume, ‘Clean’ csatorna - A tiszta csatorna hangereje
- Gain & Volume - A bemenet és a hangerő gomb, az Overdrive (torzított) csatorna alatt, kis választó gombbal.
- Bass, Contour & Treble - Mély, közép és magas hangszín.
- Preset/Adjust & FX level - digitális effektek kiválasztása és paraméterezése
The below amp is a Peavey 6505+ head unit. While it might look daunting compared to the above examples, when you look closer it becomes clear that this amp is actually pretty basic.

Az erősítőn két csatorna van, független vezérléssel. Bár sok a gomb, de ez azért van, mert minden csatornának dedikált vezérlői vannak. Ez azt jelenti, hogy különböző EQ-beállításokat állíthat be a „Rhythm” (ritmus) vagy a „Lead” (Szóló) csatornákhoz. A fő vezérlők:
The unit has two channels with independent controls. So while it looks like a lot of knobs, it’s only because each channel has dedicated controls rather than master controls. This means you can set different EQ settings for the ‘Rhythm’ or ‘Lead’ channels. Here are the main controls:
- Elő- és utóerősítő gombok (egy készlet minden csatornához)
- Low, Mid és High EQ gombok (egy készlet minden csatornához)
- Resonance (Rezonancia) Presence (Jelenlét) gombok (egy készlet minden csatornához
Általában tehát mindig az alábbiak megtalálhatók:
- Erősítési lehetőségek (csatornánként egy vagy két erősítés gomb)
- EQ (Equalizer = hangszínszabályzó) a mély, közép, magas hangok
- Csatorna és Master (fő) hangerő beállításai
ezeken kívül minden erősítőnek más és más további beállításai lehetnek, de ezeket kell állítani, hogy a kívánt hangszínt és hangerőt hozzuk létre. A fő jellemzők: az erősítés (Gain), hangszín ( EQ )és hangerő (volume)
Ezek a hangszíned lényeges jellemzői. A többi csak később jön.
Jó tiszta hangzás
Kezdjük a legalapvetőbb dologgal, amit beállíthatsz a gitárerősítődön: a tiszta hang beállításával. Ez egy jó kiindulási pont lesz, mert beállíthatod a gitárodnak és a pickupoknak megfelelő tiszta hangzást és a pickup kiválasztásának fontosságát.
1. Válaszd ki a tiszta csatornát, vagy tekerd le a Gain-t (erősítést), ha nincsen több csatornád.
Sok mai, modern erősítőnek több csatornája van, így ki tudsz választani egy tiszta csatornát. .
2. Kapcsolj ki minden effektet az erősítőn és pedált a gitárhoz
Jelenleg egy tiszta és száraz hangzás beállítása a cél. Ne legyen booster, compressor distrotion, flanger, stb. a gitárra kötve. A legjobb, ha a gitárt közvetlenül az erősítő bemenetére kötöd.
A digitális erősítők némelyikén a tiszta hangzáson is van valami effekt. Azt is kapcsold ki.
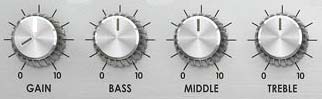
3. Állítsd a (Bass) basszus, a közép (Middle) és a magas (Treble) gombokat 12 óra irányába.
Mint korábban írtam, minden erősítő egy kicsit más, de ebben az állásban minden hangszínnek semlegesnek kell lennie. Ez lesz az erősítő természetes hangja. Valahogy így:
4. Állítsd az erősítést (Gain ) alacsonyra és a hangerőt (Volume) megfelelő szintre
Néhány erősítőnél, ha nullára állítod az erősítést (Gaint), akkor nem lesz jel. ekkor egy kicsit tekerd fel , hogy halld a gitárt és a hangerőt állítsd magasabbra, hogy kényelmes szintre hozd.
Egy hangos akkordnál ne hallj semmiféle torzítást. Ha mégis hallassz, akkor csökkentsd az erősítést (Gain). Valószíínűleg nem fogod szeretni a hangzást., de ez csak az alaphelyzet lesz.
5. Játsz egy kicsit így, hogy megérezd a hangzást
Egy kicsit játsz így, majd kapcsolj át másik hangszedőre és azon is játsszál. Legalább egy-egy percet játsz így. Ha nem tetszik, akkor majd módosítod később.
6. Gondold át, hogy mi tetszik és mi nem a hangzásban
Ez egy fontos lépés és ne ugord át, ne tekergesd a hangszíneke és a pedálokat ne kapcsolgasd véletlenszerűen.
Az elején nehéz lesz kitalálni, hogy mi nem tetszik, de itt van néhány példa:
- A hangzás túl "koszos" (muddy)
- A hangzás vékony (hollow) és üresnek hangzik
- Pengetős hangzás (twang) - mint egy mandolin
- Tetszik, hogy kristálytiszta (clear)
- Furcsa, dübörgő hang az akkordoknál
Később jobban látod a hangzás tulajdonságait, ezért írd le magadnak, hogy mit hallassz a hangzásban.
7. Kezdj kis módosításokat a hallott probléma megoldása érdekében
Az előző lépés fontos, hogy a probléma azonosítása miatt tudd, hogy mit kell megoldani.
Például először lehet, hogy nem tudo majd megoldani a "vékony és üres" hangzás, de itt még csak azt tanuljuk, hogyan hatnak az egyes gombok a hangzásra. Nincsen általános recept!
Itt van egy példa, hogyan lehet özelíteni a probléma megoldásához:
Mondjuk a hangzás vékony és üres..
Először tekerd felfelé a basszus gombot és próbáld ki minden hangszedővel. Megoldottad a problémát? Valószínűleg még mindig vékony lesz a hang, de egy kicsit erőteljesebb.Tekerd vissza a basszust.
Tekerd feljebb egy kicsit a közép gombot (Middle). Valószínűleg a hangzás kicsit olyan lesz, mintha kartonpapírból lenne az erősítő (muddy). Állítsd vissza a közepet.
Tekerd fel kicsit a magasat (Treble). A hang fényesebb, csillogóbb lesz, de mintha még vékonyabb lenne. Tekerd vissza ezt is.
Tekerd feljebb a hangerőt (Volume) és állítsd lejjebb az erősítést (Gain). Valószínűleg jobb lesz kicsit a hangzás, de még nem az igazi. Vagy kicsit növeld tovább az erősítést (Gain), maradj a változásnál, vagy térj vissza az EQ gombokhoz.
A példában azt látjuk, hogy az erősítés (Gain) növelése , a mély (Bass) és a közép (Middle) hangszínek növelése megoldhatja a problémát..
A fenti példa alapján lehet kideríteni, hogy mi a probléma a hanggal és milyen módon lehet a megoldást megtalálni. Mint írtam, nincsen általános recept a megoldásra.
ezek után ha megoldódott a probléma szánj időt az esetleges többi probléma megoldására. Csak úgy érjeted el a jó hangzást, ha időt szánsz rá.
8. Miután elégedett vagy a hangszínnel, adj hozzá effekteket
Csak azután érdemes effekteket használni egy gitárhoz, ha már megvan az a hangszín, amivel elégedett vagy. A vacak hangzást nem lehet effektekkel javítani, csak effektezett vacak hangzás marad. Ne vegyél feleslegesen pedálokat, mert attól nem lesz jó a rossz hangszín. Legyen a tiszta hangzás jó és utána már megnzéheted , hogy a pedálok mit adnak hozzá.
Ha új pedált adsz hozzá a rendszeredhez, először az effektből csak keveset használj. Így tudod megállapítani, hogy mikor jó és mikor elég az effekt szintje.
Ha az erősítőben nincsenek effektek, akkor az alábbi pedálokon érdemes elgondolkodni:
Delay - a késleltetett hang a tiszta hangot teltebbé teszi.
Reverd - Ezek a pedálok élénkebbé teszik a tiszta hangot
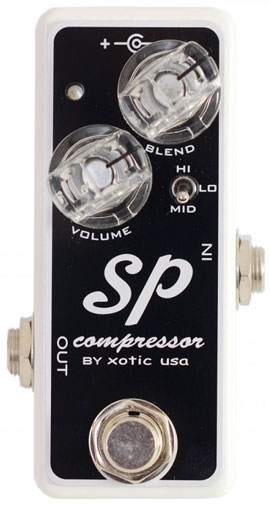
Compressor - A tiszta hangot nagy mértékben tudja javítani
9. Keress különféle tiszta hangokat
Hallgass meg néhány különböző dalt vagy gitárost tiszta hangszínekkel és a hangzások széles skáláját fogod hallani. Egyes gitárosok szeretik a gazdag hangzást, amely tele van kitartással, egészen addig a pontig, amikor már-már túlvezéreltnek tűnik (overdrive). Mások szeretik az üvegszerű hamgzáást, míg mások inkább egy kis durvaságot tesznek bele a letisztult hangzásba, hogy némi élt adjanak.
Kísérletezz a tiszta hangszínékkel, hogy megérezd az erősítőd által adott teljes tartományt. Minél markánsabb tiszta hangokat tudsz előállítani az erősítővel, annál több lehetőséged lesz később, így megéri a kísérletezéssel töltött időt.
Néhány példa a tiszta gitárhangokra, amit érdemes lehet használni::
Sweet Home Alabama – Lynyrd Skynyrd (nagyon pengő hangzás - twang - a hangszedők közel vannak a húrhoz )
One – Metallica (Figyeld meg a különbséget az intro a dallam és ritmus hangok közötti különbségeket)
Purple Rain – Prince (Selymesen tiszta hangzást keresd meg, majd utána adj hozzá effektet)
Little Wing – Stevie Ray Vaughan (A hamg egy kicsit "nyúlós", amikor erősen pengeti meg a gitárt - ez azért is van, mert fél hanggal lejjebb szól a gitár.)
Minél több féle hangszínt tudsz előállítani, annál rugalmasabb lehetsz a saját zenék írásánál vagy amikor más zenéjét akarod játszani. Szóval figyelj minden tiszta gitárhangra és próbáld meg reprodukálni az erősítőddel.
Using Pedals or Your Amp For Your Gain
Now that you have experimented with getting a good clean tone and you have a good feel for your amp’s controls, you can turn to a distorted/overdriven tone.
There are two main ways you can get a distortion/overdrive tone: use a pedal or use your amp. The right option for you depends on what gear you have available and what sounds you want to produce. Quite often a person gets frustrated with their amp because they’re unhappy with the distorted tone they’re trying to produce.
Experimenting with using pedals or your amp (or a combination of both) to produce your distorted/overdriven tone is a good starting point when getting the most out of your amp.
Some guitarists are adamant that your drive tone should come from your amp while other guitarists are just as insistent that the best drive tones come from pedals. I suggest that instead of limiting yourself to one way or another, keep your mind open to all options.
One day you might find a pedal or amp that delivers a great tone so don’t restrict yourself for now.
In my Guitar Effects Course, you can hear examples of different ways to create a drive tone. You’ll be able to compare an overdrive from an amp vs a pedal, and you’ll learn how to ‘stack’ your drives for some incredible tones.
Getting a Good Drive Tone
Let’s go through how to think about drive tones and how to set up a good tone on your amp.
1. Think about what you want out of your tone
The first thing to think about before you start setting up a drive tone is what you want to use the tone for. A lot of guitarists don’t think about this and end up with a sub-par tone as a result. The drive tone you create should match what you will play.
For example, if you’re playing rhythm guitar in a band with two guitarists, turning up the gain too high or adding in effects like delay can easily ruin your band’s overall sound. People will struggle to hear you in the wash of noise.
While your rhythm tone might sound great on your own, things change when you’re playing in a band. On the other hand, a high gain tone with delay can be perfectly suitable when playing solos or lead lines. So remember that the drive tone you use must match your situation.
Here are a couple basic examples of what type of drive tone works best for different things you might play:
Metal rhythm riffs: using a fairly low gain will bring the clarity out in your riffs. Too much gain might sound good on your own in the bedroom, but live or on recordings it can turn your tone into a mess. Lower gain gives you more definition to your riffs.
Strumming power chords: a fairly low gain gives your chords more punch. Too low gain will thin out your tone and make the chords sound less powerful.
Rock/metal solos and lead lines: higher gain will give you more sustain and help with any pinch harmonics you want to add in. Adding in effects such as delay can give your tone a fuller sound.
Blues lead or rhythm: your drive plays a big role in the feel and character of your playing. A warm overdrive that slightly breaks up your clean tone can give you plenty of inspiration. A highly saturated tone works when you want more sustain – simply use your volume knob to roll the drive back and clean up your tone as needed (similar to how Hendrix achieved his clean tone while playing live).
The first three examples above could all be found in the one song, so it’s important to remember that the tone you create should match what you’re playing. A song might start off with an intricate riff needing definition, then it might move into a power chord based verse needing less gain.
When it comes time for the solo you might find that some extra gain and delay allows your solo to shine.
While you could get away with having one drive tone for everything, you’re not going to be getting the best out of your gear. The best tone will change to match what you’re playing.
2. Start with an appropriate pickup
It’s hard to get a sharp and punchy rhythm tone when you’re using a single-coil neck pickup. It’s just as hard to get a smooth and thick lead tone when you’re using a high power humbucker on the bridge. So start off by choosing a pickup setting that matches the type of tone you will need. If you’re unsure which pickup should work best, let your ears decide.
If you’re an experienced player this might sound obvious, but it’s worth remembering that you should regularly switch between pickups when tweaking your amp’s settings. Have a listen to how your different pickups affect your drive tone and which pickups are the best fit for the drive you come up with.
3. Choose a suitable amp model (for modern digital modelling amps)
Many modern amps will give you a range of different amp models to choose from. This can often make finding the right tone complicated as you’re always wondering what the other amp models sound like.
If you’re not already very familiar with the different models your amp offers, take some time to get used to each one. Spend a few minutes with each model and jam with it. Get a feel for what style of music the model would suit and whether you like the tone or not.
After doing this you will probably find that you like a couple of the models and dislike the rest.
Find the model that is the closest to the tone you’re after without having to tweak anything. It’s possible to tweak other amp models to get the tone you’re after, but start off with the basic amp model and try to find the closest one.
Once you’ve found the amp model that gets you close to the tone you’re after, you can move to the next step.
4. Set the EQ flat and turn off any effects
Just like with your clean tone, the goal is to start off with a very flat EQ curve so you get a feel for the amp’s natural sound. You probably won’t like how it initially sounds, but it’s not a good idea to skip this step.

For now, leave the gain fairly low. We will adjust the gain later so don’t worry if it isn’t at the right level. As long as your EQ is flat and all your effects are turned off, move on to the next step.
5. Spend a few minutes jamming with this tone
Remember that you want to match your tone to a specific situation (eg: chord strumming, lead, riffs, etc.). So make sure you only play the type of stuff you want to use this drive setting for. That means don’t jam with both lead and rhythm parts because you will want different things from your tone for those situations.
If you want to get a good lead tone, play lead. If you want to set a good rhythm tone, play the type of rhythm you want to play.
Spend some time jamming with this setting and try to think what you like or dislike about the tone. Does it sound muddy? Is it thin? Does it have too much of a high-end bite? Think about what you would like to change about the tone for a while before you make any tweaks.
6. Start fixing any problems you hear in your tone
Just like with your clean tone, you should turn one knob at a time to learn how it affects your tone. Turning the bass knob up or down with a drive setting can sound completely different from turning it up or down with a clean setting. So even if you followed the above steps with your clean tone, you still need to go through the steps with your drive tone to learn how your EQ affects your tone.
Let’s say your tone sounds too boomy when playing palm-muted riffs. Here is an example of how you should try to fix the problem:
Start by checking to make sure the problem isn’t with your pickups. Jam for a while with each pickup and take note whether the boomy sound changes or not. Continue through the steps with the pickup that gives you the least boomy sound.
Turn the bass knob down and jam for a bit. Did that fix the problem? It probably did, but just for this exercise, turn the bass knob back up so you can hear how the other settings might also change your tone.
Turn the mid knob down. Did that fix the problem? Depending on your amp you might hear slightly less boom but the tone will probably sound slightly hollow. Turn the mid knob back.
Turn the treble knob up. Did that fix the problem? You will probably still have the exact same boomy sound, but now your riffs have a ‘sharper’ or brighter sound. Turn the treble knob back.
Turn the gain down and adjust the volume up to compensate. Did that fix the problem? It might have partially fixed your problem depending on your amp.
Think about how each knob affected your tone. If any of the changes you made improved your tone, make that change now. In this example, it probably means you would lower the bass knob, slightly raise the high knob and adjust the gain down slightly.
Once you make those changes, jam with the result and think about what further tweaks you might want to make. Repeat the steps until you find the setting that doesn’t need any more tweaks.
Remember that every amp is different so if you have a problem with your tone the only way you will solve it is to go through the steps above.
7. Add in any effects you want to use
Depending on what you want to play, you might add in effects such as delay or a compressor, or you might use modulation effects such as a phaser or chorus. Adjust the effect’s settings to suit your tone. You might also need to make slight tweaks to your amp’s settings after you add in any pedals, but they should really be only minor tweaks.
8. Adjust your gain to the right level
Once you have added in any effects, you can now adjust the gain to find the ideal level. Start with the gain turned right down and slightly turn it up a little bit at a time while jamming. Every time you turn the gain up, think to yourself whether the change improved your tone or not.
You will find that at a certain point adding more gain doesn’t improve your tone. When you reach that point, start slightly rolling off the gain and ask yourself whether it improves the tone. You will probably find that you can roll a fair bit of gain off before it starts feeling like you’re taking away from your tone.
Your ideal gain level is somewhere between those two points. It’s not an exact science so leave your gain at a level where you feel happy with the result.
9. Write down the settings you used for this drive
Writing down the exact settings you use along with any notes such as what you like about the tone or what type of playing it suits is a great way to learn how to get the most out of your gear.
Every time you come up with a new drive tone, write down notes so you can reproduce it. In a year’s time, you might have 20 unique drive tones and exact settings to reproduce them as needed. Or if you record a song with a certain tone, you now have a way to reproduce that tone exactly.
Not only is this a good way of keeping a record of the tones you come up with, but it helps you learn to get the most out of your amp. I’ve seen a lot of students struggle with their tone because they don’t learn from their experiences.
Written notes help you remember how and why different settings sound good or bad.
10. Try to replicate different drive sounds from different guitarists
Go through your music collection and pick out 5 completely different drive sounds. Try to find a mix of both rhythm and lead tones and in different styles if you can. The goal here is to see how wide you can push your amp.
Can you get a solid rhythm metal tone, a warm blues tone, a high sustain lead tone or a vintage rock tone all with your amp? If you take the time to experiment with your amp, you’ll be surprised how many different tones you can achieve – especially if you have a modelling amp.
Even if you only like to play one style of music, it’s still worth trying to come up with different tones. Every time you try and emulate a different tone, you learn how your amp works. So when you go back to your original tone, you will find you can make further improvements to it. It’s worth the effort.
Get More From Your Amp
If you spend time applying the advice in this guide, you will learn how to get the most out of your amp. Don’t expect to rush through the above steps once and become an expert on your amp’s tone. It doesn’t work that way. Your ears need time to learn how your amp’s EQ knobs affect your tone or how much gain is the ideal amount.
Practice getting to know your amp just like you would practice a song. The more time you spend slowly going through the above steps, the better your tone will become.
Guitar Effects Course
If you use any guitar pedals or are thinking of adding effects to your rig, check out my Guitar Effects Course. The course gives a complete overview of the most common types of guitar effects, how they work and how to get the best sound out of them.
The more you understand guitar effects, the easier it is to use them to craft a better tone. The guitar effects course will cover everything you need to get the most out of any pedals you own.
Other Useful Guides
There’s a lot more you can do to achieve a good tone with your amp. Here are a few guides to help you get more out of your amp: